Canadian Airgun Forum

The #1 Community for Airguns in Canada!
It is currently Sun Apr 28, 2024 11:31 am

All times are UTC - 5 hours


The Canadian Airgun Forums are a place for people to discuss and learn about airguns and the airgunning sport in Canada. There are lots of discussions about airguns, airgun accessories, reviews, modification and repair information, airgun events, field target and free classifieds!


You need to register before you can post: click the register link to proceed. Before you register, please read the forum rules. By joining our free community you will have access to post topics, communicate privately with other members (PM), respond to polls, upload your own pictures, and access many other special features. Registration is fast, simple, and absolutely free! To start viewing messages, select the forum that you want to visit from the selection below.


Post new topic Reply to topic  [ 4 posts ] 
Author Message
PostPosted: Sat Dec 02, 2023 4:43 pm 
Offline

Joined: Tue Oct 18, 2011 12:21 pm
Posts: 606
Location: Ontario
Part 1: A itch that needs to be scratched.

The opening project for Shop season 2023 was a .177 pellet mold, it was a bit disappointing because my cast pellets were oversized and required resizing to be able to shoot them. Even then the results were not very good.

It has been documented in the post about making a .177 mold …
topic93652.html

… evaluating the pellets cast from the mold …
topic93815.html

… and in the post about the resizing exploration.
post598383.html#p598383

In mid-November, as my last project before closing my shop for the winter, I decided to revisit the .177 mold.

Since the solid blocks approach used in my first version of the .177 mold required custom cutters and machining both halves independently, this time, I opted for a modular approach that worked successfully when I made two .22 molds several years ago. Both molds have removable plates containing several drilling operations performed on one side or on the flip side to shape (once the plates are stacked) the projectile to be cast.

The pictures on the left shows the first .22 mold machined with a CNC Mill and, the pictures on the right, the second mold that was fabricated manually with only basic tools.

Attachment:
A01.JPG
A01.JPG [ 206.4 KiB | Viewed 221 times ]


To keep down the projectile weight, I wanted the length of the pellet to be around a quarter of an inch. After looking at what thickness of sheet metal I had in the shop I selected three sizes. The bottom layer was 1/8”, the middle one was .078” and the top was .050”. I also found a piece of aluminum that would become the Main Block.

I used 1/16” pins to locate the layer plates on the top of the block and added four 4-40 flat head screws to keep everything together. The assembly was cleaned on four sides. I also drilled two location holes through the Main Block for 1/8” pins that would line up both halves of the finished mold.

The stack was cut in half on the band saw and the mating faces were machined on the mill. The next step was to start making the pellet cavities and I wanted the nose of the cast pellet to be cut by the sprue plate. This meant the nose would be in the .050” plate and the tail in the 1/8’ plate.

Most of the drilling was to be made on the reverse side of the plates so a sacrificial wooden jig was prepared to hold the pinned plates together in the vise.

Four holes were made with a 7/64” (.109”) drill through the three plates stacked in reverse order (thinnest at the bottom and thickest on top). With a “Dremel diamond grit conical bit”, a taper was cut in the 1/8” plate from 7/64” diameter to about .168”. The base of the pellet was made with a number 16 drill (.177”) connecting with the large end of the taper.

The thick and medium layers were removed and the head was drilled in the .050” layer with a number 17 drill (.173”) from the reverse side. After that, this plate was also removed and the .078” layer replaced it, good side up, in the jig. The same drill (.173”) just chamfered the entrance of the .109” hole to create the transition from the nose to the neck of the pellet.

The stack of machined plates was reattached to the Main Block halves and the other threaded holes for the sprue plate pivot and stopper as well as those for attaching the handles were completed.

The picture below shows a closeup of one half of the mold.

Attachment:
A02.JPG
A02.JPG [ 155.25 KiB | Viewed 221 times ]


When I machined the first .177 mold earlier last Spring, the piece of brass from which I made the Sprue Cutter was a bit short and it was damaging the wooden shaft I used to tap it open. In this version, I added an aluminum extension to help the cutting of the lead sprue as it can be seen below on the left. A hot glue gun produced my first protype pellets from the finished mold as shown on the right.

Attachment:
A03.JPG
A03.JPG [ 155.52 KiB | Viewed 221 times ]


My hopes for a working pellet were very quickly killed in the egg. Some measurements told me that I had (again) made oversized projectiles, which was confirmed by jamming some of my test airguns.

I thought that the numbered drills selected would not be too far out the mark. I have been proven wrong.

R-Gun Pete


Top
 Profile  
 
PostPosted: Sat Dec 02, 2023 4:45 pm 
Offline

Joined: Tue Oct 18, 2011 12:21 pm
Posts: 606
Location: Ontario
Part 2: The beauty of a modular design.

The balance of my mold block was still useable so only a new set of plates needed to be remachined. This time, just to be on the safe side, I made two sets.

After my first attempt (where I made the taper with the Dremel bit) I realized that it was not the ideal tool for aluminum. I decided to machine a custom taper tool from a piece of drill stock.

I started by cutting the tapered shape on the lathe then milling the flutes on the mill. To keep as much material at the root, the part was held in a V block (sitting on an angle bar) to place the tapered profile parallel with the tip of the endmill. I also thought that 3 flutes would be a good compromise between strength and cutting edges. Then I hardened the rod by heating it with a propane torch and quenched it in oil.

I tested the tool on a piece of aluminum in which I already drilled the basic hole that I wanted to taper. I don’t remember now what RPM I used but I guess it was too fast because the result I got was really bad. The tool didn’t want to cut even when a lot of pressure was applied and as a result it ended up being deformed.

When I looked at my countersink bits I discovered that one type had multiple shallow flutes and the other type had a single cutting edge. The other end of my tool was turned to obtain the taper and a single flute was machined on the mill.

The pictures below shows the tool when it was milled (on the left), after quenching (center) and the tool with the single flute on one end and the twisted tip on the opposite end (on the right). It has some residue and rubbing mark because I forgot to take a picture before cutting the cavities in the plates.

Attachment:
B01.JPG
B01.JPG [ 121.08 KiB | Viewed 219 times ]


To be sure not to destroy the single flute tool, I tested it by cutting by hand. It was installed in the drill chuck and I was applying down pressure with the mill head but I was not using the power of the machine and spun the spindle manually.

The taper in the test piece was satisfactory so repeated the same operation for each of the cavities in the upside down stacked up plates (pre-drilled 1/8” through all). It should be noted that the largest cylindrical part of the cutter after the taper was .176” to ensure that the cavity would not be oversized.

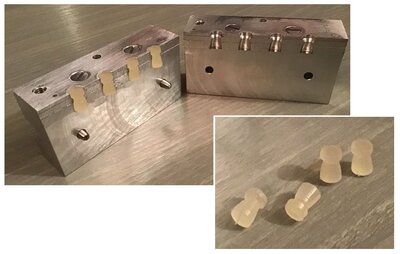
Both the .125” and .078” plates were removed and the same taper tool was used to manually cut the four pellet heads in the .050” plate. Again, the largest diameter would not exceed .176”. When I stacked the three plates together to check what the pellet would look like, I noticed that the transition from the head to the neck would be fairly abrupt and maybe cause a choking point preventing a good flow of the molten lead to the base. This was solved by reinstalling the .078” plates good side up and chamfering the entrances of the neck so they would match the .176” diameter of the head. This time it looked a lot better.

A quick test with the glue gun and the result can be seen in the pictures below.

Attachment:
B02.JPG
B02.JPG [ 144.63 KiB | Viewed 219 times ]


This time, the molded pellets that I measured with my caliper were not oversized and after trying them in several pistols and rifles they seemed perfect. Not small enough that they would fall through the barrel and not large enough to cause a jam with any of the the airguns.

I thought I had a winner. To actually confirm it, I would need to cast pellets in lead.

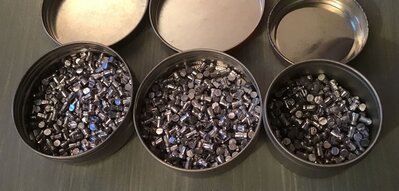
A couple of days ago I was able to spend several hours to make enough pellets to run a series of tests. The mold was smoked before my casting session but for some reasons, instead of falling off easily, the pellets always stayed stuck in the cavities of the left block even after knocking the handles with my wood rod. Eventually I discovered that it needed several sharp blows to dislodge them. In turn, it caused some other problems as it was rattling lose all my screws (the sprue cutter as well as the ones holding the plates) and even my locating pins. On top of that I think that my sprue cutter plate was not sharp enough.

Anyway I was able to complete my casting session and the result is shown below.

Attachment:
B03.JPG
B03.JPG [ 238.76 KiB | Viewed 219 times ]


I am not sure how it could have happened but the measured lead pellets are slightly larger than I expected. I guess that the shrinking factor of the hot glue is different than the one for lead and I also guess that my manual reaming could have produced a larger hole than what I was expecting.

Anyway, that being said, when I did random measurements (with my digital caliper) of a few dozens of pellets I discovered variations going from .1765” to .1790” and weight variations from 15 to 15.9 grains (4 groups: 15, 15.3, 15.6 and 15.9).

Due to the concern about lead dust and shavings, I will have to wait until Spring to conduct the main bulk of testing in my garage. But I was too curious to wait and just got both cars out to quickly test the pellets in a few selected airguns (Crosman Quest 500, Daisy 853C and CZ 200 T).

Both the Crosman and the CZ can shoot all the pellets randomly taken in the containers. Some pellets loaded easily and some other were fairly tight which confirm the variations in diameters. Since both the head and the tail were made with the taper tool, the contact ring at both places is tiny and it is probably what is saving me. The impact point is a bit lower for the larger pellet as it offers more friction and resistance but at least both rifles can handle it.

The Daisy 853C is another story. It is such a wimp compared to the other two and I could not shoot random pellets directly from the container. If I sorted all the smallest pellets for it, that could work but it doesn’t take that much to choke it.

In Conclusion, it is a big improvement when compared to the first attempt I made at the beginning of my Shop season, so I am relatively satisfied for now.

This post could be updated in 2024 when I will have a chance to really experiment with the .177 pellets from the casting session.

Until then I wish everybody a Merry Christmas and a Happy New Year (it might be a bit early but we are in December after all).

R-Gun Pete


Top
 Profile  
 
PostPosted: Sat Dec 02, 2023 6:20 pm 
Offline
User avatar

Joined: Fri Jan 22, 2010 1:17 pm
Posts: 4167
Location: Kingston, ON
Interesting work once again. :drinkers:
You could try pushing the pellets through a pellet sizer to improve the diameter consistency and reduce one of the variables. I doubt you'd want to do "pellet shaving" but you could try a few to get the weights a bit closer to 15 gr.
Maybe we can have another outdoor garage shoot with springers next January, on a sunny day! 8) :drinkers:

_________________

))))----//----------==

Iacio, ergo sum


Top
 Profile  
 
PostPosted: Sat Dec 02, 2023 6:36 pm 
Offline

Joined: Tue Oct 18, 2011 12:21 pm
Posts: 606
Location: Ontario
Hi Duke.

I may try to sort what I have by size/weight and keep them as they were cast.

Eventually I would prefer to avoid the resizing route if possible, I have been through that and it is not my idea of fun.

For shooting outdoor maybe nice early Spring days would be a bit more comfortable.

I will keep in touch.

Thanks.

R-Gun Pete


Top
 Profile  
 
Display posts from previous:  Sort by  
Post new topic Reply to topic  [ 4 posts ] 

All times are UTC - 5 hours


Who is online

Users browsing this forum: No registered users and 3 guests


You cannot post new topics in this forum
You cannot reply to topics in this forum
You cannot edit your posts in this forum
You cannot delete your posts in this forum
You cannot post attachments in this forum

Search for:
Jump to:  
News News Site map Site map SitemapIndex SitemapIndex RSS Feed RSS Feed Channel list Channel list

Powered by phpBB © 2000, 2002, 2005, 2007 phpBB Group

phpBB SEO