Canadian Airgun Forum

The #1 Community for Airguns in Canada!
It is currently Sat Apr 27, 2024 4:57 am

All times are UTC - 5 hours


The Canadian Airgun Forums are a place for people to discuss and learn about airguns and the airgunning sport in Canada. There are lots of discussions about airguns, airgun accessories, reviews, modification and repair information, airgun events, field target and free classifieds!


You need to register before you can post: click the register link to proceed. Before you register, please read the forum rules. By joining our free community you will have access to post topics, communicate privately with other members (PM), respond to polls, upload your own pictures, and access many other special features. Registration is fast, simple, and absolutely free! To start viewing messages, select the forum that you want to visit from the selection below.


Post new topic Reply to topic  [ 8 posts ] 
Author Message
 Post subject: Making Iron Sights
PostPosted: Wed Dec 13, 2023 5:16 pm 
Offline

Joined: Tue Oct 18, 2011 12:21 pm
Posts: 606
Location: Ontario
Introduction

From 1998 until 2003, I bought only air pistols and they all came with iron sights. This was the way I liked it, no customization and basic stock models. A few air pistols had adjustable rear sights but most were just fixed sights at both rear and front. This meant that the shooter must become intimate which each one and remember the sight picture associated with a specific model.

In 2003, I bought my first rifle. It was the Umarex Walther Lever Action .177 pellet air rifle (one of the first “detuned” batch specially ordered for Canada by North Sylva in Toronto) and it was even more expensive than buying a .22 powder burner lever action. The rifle had iron sights and I was happy with its performance. In 2004, I added a Winchester (Daisy) model 1894 and a Daisy Red Rider, both were BB guns.

From 2004 to 2010, I was back at buying only air pistols. My purchase pattern was all over the place and I was getting whatever I could find. This was the period when I started in “Softair” pistols (either in CO2 or green gas) and I had several lucky hits at flea markets for vintage air pistols.

By now my collection of handguns was well under way and I had a fairly good idea of where it was going. In the meanwhile, I was still lurking at air rifles and trying the fight the itch to buy more.

I knew that if I started a rifle collection, it could not be the same as my air pistol collection which had the ambitious goal to follow the timeline of firearms from black powder to recent times. So I simply decided to get samples of different powerplants, calibres and mechanical systems. The main criteria would be to keep the air rifles in the under 500 fps category.

Early 2010, I bought a Crosman Quest 500 (a break barrel springer) and a Daisy 853C (a single stroke pneumatic) both shooting .177 pellets. I must mention that I always shoot offhand, since the Quest came scoped, I quickly discovered that I didn’t like scope. A scope magnifies the target but also increases the perceived wobble when trying to hold the rifle steady. On the other hand, the Daisy 853C came with an aperture sight and this was a revelation. From that point one, “Peep Sight” became my preferred type of sights.

So over the next few years (2010-2013), I got two Chinese air rifles in .22 (Industry Brand QB57 (side lever springer) and AR2078A (CO2)), a Russian IZH 61 in .177 (a 5 shots side lever springer), a CZ 200T in .177 (PCP), a Benjamin NP Trail All Weather in .22 (Nitro-Piston Break Barrel), a Hatsan AT44W ten shots in .22 (PCP), Bob Sterne’s Custom 9mm rifle under 500 fps (PCP) and a Weihrauch HW57 in .177 (underlever springer). From that list, the AR2078A, the CZ 200T and the HW57 had aperture sights, the QB57, the IZH 61 and the Hatsan AT44W had regular iron sights, the NP Trail came with a scope and the 9mm air rifle had nothing.

As mentioned with the Quest 500, scope is not my bag of tea so, when I shot the Benjamin NP Trail with its scope, I obtained abysmal results. What I was getting with the Quest didn’t give me bragging rights but at least the shots were hitting in the general direction of my point of aim. The NT was shooting all over the place, to the point that I was sure that the scope was defective. To be sure that there was nothing wrong with the Benjamin air rifle, I removed the scope and placed two thin strips of masking tape, one at the end of the barrel and one on the receiver close to my eyes. This was my first homemade sight and you know what… it worked well for what I wanted to verify which was to demonstrate that the NP Trail could shoot.

I wrote to Crosman to complain about their defective scope and they sent me a new one. In the meanwhile I came across some blogs explaining barrel drooping and floating reticule and realized that the original scope was probably not defective but adjusted to its limits. Maybe some shimming and re-zeroing might have solved the problem but I was done with it anyway. I wanted my Benjamin NP Trail to have iron sights.

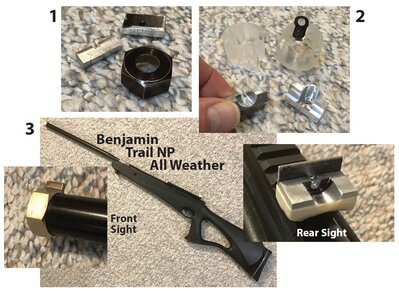
From the start I wanted to keep all my airguns in their original state so any alteration I made to one should be reversible. Following that rule, I looked at what could be done to add iron sights to a rifle intended to be scoped. The barrel shroud of the Benjamin NP Trail is ¾” and after looking in the house I found a brass plumbing nut that could become a front sight if the internal thread was removed. The rail where to mount the scope was of the Weaver style with a spacing of about ¼”, after finding two small pieces I cut a notch in one and drilled a hole in the other to obtain two rear sights to start my tests. In picture 1 below, both plates and the nut are shown. The black on the nut and one of the plates was added with a permanent black Sharpie.

After a few tests confirming the principle, I decided to make nicer sights and having access to a CNC mill I machined two aluminum rear sights (one notched and one with a recessed hole) and a couple of copies of a front sight made from plexiglass. In picture 2, some black was added to outline the hole in one the plexiglass front sights. It should be noted that they are all friction fit.

It was a long time ago and I don’t remember exactly the test results with the machined sights but from what I still have on the NP trail it seems that I preferred the notched rear sight combined with a blade brazed to a plumbing nut as the front sight. That arrangement was further modified to transform the notched rear sight into a peep sight with the addition of a thin plate. This is what I am still using when shooting with the Benjamin NP Trail and it is shown in the three pictures for number 3 below.

Attachment:
A01.JPG
A01.JPG [ 225.28 KiB | Viewed 425 times ]


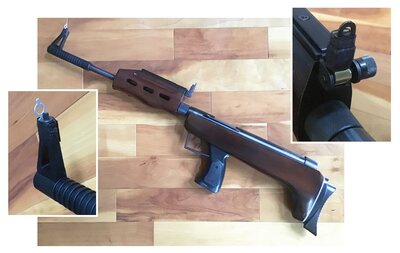
Having realized that I didn’t have to live with the sights installed on a gun if I am not happy with them, I modified the QB57. The result is a bit crude but it works for me. Both the front and rear sights have been transformed into rings as it can be seen in the three pictures below.

Attachment:
A02.JPG
A02.JPG [ 151.63 KiB | Viewed 425 times ]


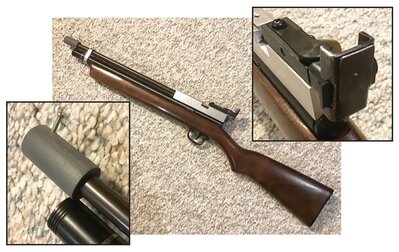
Later when I purchased Bob Sterne’s 9mm air rifle (which was scoped when he was using it) I needed to think about making a set of sights if I wanted to be able to shoot it. The rear sight was easily solved as the AR2078A came with two complete adjustable sights: one peep sight that was already on the AR2078A and a spare notched sight. The spare was modified into a peep sight by adding a short piece of “U” channel and a thin plate with a hole. For the front sight, I was lucky to come across a piece of hard plastic tubing that fitted as a sleeve over the end of the barrel. There was enough meat in the wall thickness of the tube to install a screw and it became my front bead.

The pictures below show Bob Sterne’s air rifle with the front and rear sight.

Attachment:
A03.JPG
A03.JPG [ 260.13 KiB | Viewed 425 times ]


After these few successful experiences the ice was broken and whenever I encounter other sights I didn’t like or fixed sights that were off, I took the matter in my own hands.

R-Gun Pete


Top
 Profile  
 
 Post subject: Re: Making Iron Sights
PostPosted: Wed Dec 13, 2023 5:18 pm 
Offline

Joined: Tue Oct 18, 2011 12:21 pm
Posts: 606
Location: Ontario
Part 2: Whatever works.

From that point on, I was looking in my environment (at home or at work) for anything that I could use as a basis for a rear sight. The machining shop at work had a scrap bin where all sort of aluminum bits and pieces ended up, let’s say I became a regular visitor.

I came across some bent sheet metal pieces of about the right width that could be filed to fit the grooves of an air rifle. Again, I was relying on friction fit to hold the part in place and it has not been an issue. In other cases, I started with a flat sheet and bent it myself.

In the pictures below:
1. It is a single piece rear sight for my IZH 61.
2. These are photos from both sides of the rear sight and as creating the aperture is a bit of guess work sometime the hole gets too large, here another plate was added with a smaller properly positioned hole.
3. Those are photos from both sides of a plate bent over a notched sight to transform it into a peep sight.

Attachment:
B01.JPG
B01.JPG [ 139.69 KiB | Viewed 424 times ]


I also found, in the scrap bin, pieces of aluminum window frame of different profiles. This took a bit more imagination to transform them, but it worked too. For number 1, the cuts matching the receiver grooves were friction fit (the same as for the previous sights I made) but for number 2, I tried something different and two small pieces to engage the receiver grooves were prepared then they were screwed in from above to lock the assembly. Both rear sights were made from window frame extrusions and are shown below.

Attachment:
B02.JPG
B02.JPG [ 138.63 KiB | Viewed 424 times ]


After buying a Moisin Nagant M1944 BB airgun that had a rear sight adjustable for elevation, but not for windage, I discovered that it was consistently shooting to the left. I placed a strip of masking tape to the right of the notch to help lining up the front blade and the correction was fairly effective, so I decided to make a peep sight adaptor to piggyback on the existing part. This worked very well and the result can be seen in the picture below.

Attachment:
B03.JPG
B03.JPG [ 111.03 KiB | Viewed 424 times ]


All the sights in this section are not presenting a high level of craftmanship but they are doing the job as intended.

R-Gun Pete


Top
 Profile  
 
 Post subject: Re: Making Iron Sights
PostPosted: Wed Dec 13, 2023 5:20 pm 
Offline

Joined: Tue Oct 18, 2011 12:21 pm
Posts: 606
Location: Ontario
Part 3: Getting a bit more refined.

Sometime past the middle of Summer 2023, I was looking for short projects that could be done within a day and I thought of revisiting the manufacturing of rear sights, this time with better machinery.

I was thinking to use a dovetail router bit as an experiment, but it didn’t take long to discover that the angle on the receiver grooves of an airgun were not 45 degrees. For my first attempt on this new series, I cleaned up a quarter inch aluminum plate on the mill. I wanted to have a single piece base so I cut a groove midway on the plate that remove about half its thickness in order to make it easier to bend it 90 degrees. On the region of the “L” bracket that would attach to the receiver of my Diana Mauser K98, a groove was machined to the root size of the intended dove tail then the dove tail was shaped with the help of a bandsaw. After some filing, it went on the airgun receiver with a friction fit. On the upright, I had to guess the approximate position of the sighting hole which, to get it finalized, required the making of another thin plate with a small hole. The Mauser K98 rear sight is shown below.

Attachment:
C01.JPG
C01.JPG [ 151.76 KiB | Viewed 424 times ]


Again, I was able to obtain a good working rear sight but I was not completely satisfied with the artisanal way of cutting the dovetail.

I own a nice little vise that could rotate and also be adjusted for angle (360 degrees swivel and 0-90 degrees tilt) that might prove ideal for what I had in mind. Making some tests with a 1/8” endmill and a couple of aluminum blocks I confirmed that the idea worked.

This time I wanted both sides of the base to be screwed together (to provide firm clamping of the receiver instead of relying on a friction fit like the previous sights I made). That decision forced me to start with a thicker aluminum plate. To bend it like I did previously I removed enough material to be left with an about 1/8” thick transition. This was when I discovered that not all aluminum were created equal. Because I am using bits and pieces of unknown origin, I guess the ¼” plate was of a bendable type and the thicker plate was not. The result was that my single part sight became a two part sight. A few changes of design performed on the fly and I was able to salvage the work done until that point. My Crosman 622 would get a rear sight after all. The test blocks are shown on the left and the rear sight installed on the 622 is on the right

Attachment:
C02.JPG
C02.JPG [ 205.56 KiB | Viewed 424 times ]


I always liked the tang peep sight found on some of the older cowboy rifles because it looks cool. I have a second Crosman 622 and I wanted to have the same feel to the rear sight I would be making for it but, at the same time, I didn’t want to damage the wood stock.

The option was to start with one of my test blocks as the anchor and from that point to design the other components to achieve a look similar to a tang sight without damaging the rifle stock.

I am pleased with the result and the installed peep sight is shown from both direction in the pictures below. It even has some degree of adjustability too.

Attachment:
C03.JPG
C03.JPG [ 131.72 KiB | Viewed 424 times ]


In conclusion, making sights is interesting and it provides nice little short term projects that could improve the shooting experience.

R-Gun Pete


Top
 Profile  
 
 Post subject: Re: Making Iron Sights
PostPosted: Wed Dec 13, 2023 5:21 pm 
Offline

Joined: Tue Oct 18, 2011 12:21 pm
Posts: 606
Location: Ontario
Part 4: Did I forget something?

In the previous posts, I went over all the front and rear sights I made playing with my tools in my garage but for people who have access to a 3D printer, sight making would be practically limitless.

1n 2017, because I was interested in casting heavy .22 pellets I made the jump and bought my first PAL air rifle to be able to shoot them with enough oomph. It was a Benjamin Maximus and it came with the basic Crosman sights and as I mentioned in the first post, I preferred peep sight. I had the chance to be able to design a set of front/rear sights and to experiment with the 3D printing until I obtained something I liked.

Underneath, there are some examples of the experimentation.

Attachment:
D01.JPG
D01.JPG [ 172.42 KiB | Viewed 424 times ]


I discovered that, in my case, the front sight was working the best if I anchored it to the barrel band, I also made the rear sight adjustable as shown in the pictures below.

Attachment:
D02.JPG
D02.JPG [ 124.74 KiB | Viewed 424 times ]


I think, this time, I covered everything.

R-Gun Pete


Top
 Profile  
 
 Post subject: Re: Making Iron Sights
PostPosted: Wed Dec 13, 2023 5:37 pm 
Offline

Joined: Wed Jan 05, 2011 12:35 pm
Posts: 11369
Location: P.G. B.C.
Cool beans, man. I'd have gone with dovetails (been doing that since 1972) fore and aft and sights from trackofthewolf.com. Up until I discovered Track in about 1977, I had been making my own
as you do.

_________________
Best Wishes
Daryl


Top
 Profile  
 
 Post subject: Re: Making Iron Sights
PostPosted: Wed Dec 13, 2023 5:50 pm 
Offline

Joined: Sun Jan 01, 2023 4:05 pm
Posts: 733
Nice work Pete!


Top
 Profile  
 
 Post subject: Re: Making Iron Sights
PostPosted: Wed Dec 13, 2023 11:03 pm 
Offline

Joined: Sat Jul 11, 2020 5:36 pm
Posts: 819
Location: Chilliwack, BC
Nice work. If my eyes could handle iron sights, I'd be tempted to go back to them to play.

_________________
Slavia 618 .177
Webley Senior .22
Jelly SUPER 4.5 mm
Webley Viscount .177
Kral Mega Marine Walnut .22
Artemis PP750 .22
FX Streamline .22 walnut
FX Streamline .22 composite
FX Dynamic 500 .22


Top
 Profile  
 
 Post subject: Re: Making Iron Sights
PostPosted: Thu Dec 14, 2023 5:47 pm 
Offline

Joined: Tue Oct 18, 2011 12:21 pm
Posts: 606
Location: Ontario
Thanks for the comments guys.

I was working on another post to wrap up the question of iron sights.

I have been using a three-point sight system since 2012 and I am wondering if other people use something similar or am I the only one?

Anyway this is the link for the other post.
topic94816.html

Cheers.

R-Gun Pete


Top
 Profile  
 
Display posts from previous:  Sort by  
Post new topic Reply to topic  [ 8 posts ] 

All times are UTC - 5 hours


Who is online

Users browsing this forum: No registered users and 3 guests


You cannot post new topics in this forum
You cannot reply to topics in this forum
You cannot edit your posts in this forum
You cannot delete your posts in this forum
You cannot post attachments in this forum

Search for:
Jump to:  
News News Site map Site map SitemapIndex SitemapIndex RSS Feed RSS Feed Channel list Channel list

Powered by phpBB © 2000, 2002, 2005, 2007 phpBB Group

phpBB SEO