Canadian Airgun Forum

The #1 Community for Airguns in Canada!
It is currently Thu Apr 18, 2024 2:06 pm

All times are UTC - 5 hours


The Canadian Airgun Forums are a place for people to discuss and learn about airguns and the airgunning sport in Canada. There are lots of discussions about airguns, airgun accessories, reviews, modification and repair information, airgun events, field target and free classifieds!


You need to register before you can post: click the register link to proceed. Before you register, please read the forum rules. By joining our free community you will have access to post topics, communicate privately with other members (PM), respond to polls, upload your own pictures, and access many other special features. Registration is fast, simple, and absolutely free! To start viewing messages, select the forum that you want to visit from the selection below.


Post new topic Reply to topic  [ 44 posts ]  Go to page Previous  1, 2, 3
Author Message
PostPosted: Tue Jan 06, 2015 1:10 pm 
Offline

Joined: Wed Jul 16, 2014 1:24 pm
Posts: 801
Location: Vancouver, BC
The Pneuma unfortunately would need a bigger diameter, so I'm pretty much stuck with a soft bag. I really like the idea of that pitch-and-putt bag, though. Something like this, which isn't quite long enough:

http://www.amazon.ca/ProActive-Sports-5 ... s=golf+bag

The 7 inch would probably handle it, and it even has a little accessory pocket. You could even put in a putter sticking out as a decoy!

_________________
Mike

FX Streamline .22 - Optisan Mamba Lite 4-16X44
Hammerli Pneuma Elite 10 .22 - Bushnell Elite 4200 4-12X40
Custom Crosman 2240 w/ LW barrel - Vortex Strikefire
Remington AirMaster 77 PAL rated - CenterPoint 3-9X40


Top
 Profile  
 
PostPosted: Tue Jan 06, 2015 1:23 pm 
Offline

Joined: Tue Oct 13, 2009 1:27 am
Posts: 2523
Location: Vancouver
Here's the Proactive site page for the product with a bit more information:
http://shop.proactivesports.com/storefr ... ber=MGB088
So yeah, 35" is a bit short, but you could just get one of those golf club booties or whatever they're called and stick it over the barrel. Something suited for a driver would work nicely, provided it was long enough. Like this:
http://shop.proactivesports.com/storefr ... ber=HSC301
Hey, it's even called 'stealth black'!


Top
 Profile  
 
PostPosted: Tue Jan 20, 2015 9:20 pm 
Offline

Joined: Tue Oct 13, 2009 1:27 am
Posts: 2523
Location: Vancouver
I've mutilated my 2240 a bit more. Done umpteen tweaks with the spring length and preload and finally figured out a way to mimic what a regulator does. I cut a slot in the stock socket and through the stock aluminum pipe for 1/4 of the diameter, then drilled 4 holes in the head of the bolt in Rick's RVA, such that I can use a simple pin tool to reduce spring preload as I shoot. A bunch of Chrony testing and adjustments led me to a spot where I can pump to 2,600psi, shoot 5 or 6 shots, then drop preload by 1/4 turn, shoot another 5 shots, drop another 1/4 turn, shoot another 5, then drop 1/4 turn for the last time. This is giving me a relatively even velocity with extreme velocity variation of under 7% total. Close enough.

Image
Image

I've added a pin to the back of my custom RVA adjusting wrench, so now I can just flip the preload down as I go without having to remove the stock to adjust it. Now there'll be no more guessing about elevation of impact point as the pressure runs down. Seems to me a Chrony is a necessity for those interested in accurate shot placement with a PCP, at least those without regulators. I looked into getting a regulator but the best company making small ones - http://www.huma-air.com - says the HiPAC is made too poorly to merit their interest in fitting one of their regulators to it. Oh well.

I've also made a neoprene sleeve to give something more comfortable to hold onto on the tube. It's glued at the edge then sewn, with a velcro attachment behind the front scope mount. It's made to un-velcro then slip off the barrel shroud/HiPAC when I need to do maintenance inside the gun. Hides the mess I made of the paint job when tightening the HiPAC as well. :oops:

The scope I settled on (not a Leupold for now as I just wasn't feeling rich enough when staring at the scope displays at Reliable) is a 4x32 Simmons, made by Bushnell. $50 plus a pair of Burris low-rise steel mounts for another $20. The eye relief turned out to be too long for the Crosman steel breech, so I used a shaped Dremel cutoff wheel to carve dovetails into my barrel shroud. Worked out well, shifting my zero only a few clicks and putting my head in a comfortable position on the stock. Got the parallax adjusted by turning the objective lens out about 2.5 turns, so my usual range of between 10 and 40 metres is virtually parallax free. The Simmons 'rimfire' model scope came with parallax set to 50 yards, which isn't really relevant for my airgun. Something closer to 24 metres seems a good compromise.

Image

The one remaining problem is a slow but persistent leak. Thought I'd cranked the HiPAC on tightly enough the other night, but today it's hissing again. More like a very tiny whistling. Seems my delrin washer isn't good enough. So I'm going to look around for bonded seal washers. Seems like the way to go. Or failing that maybe a shaped delrin seal and doing a bit of face detail turning on the Crosman brass valve to seat the washer properly. The current setup with the front end swaged in to support the washer is a bit mickey mouse when coping with up to 3Kpsi pressure.


Top
 Profile  
 
PostPosted: Wed Jan 21, 2015 12:37 am 
Offline

Joined: Tue Oct 13, 2009 1:27 am
Posts: 2523
Location: Vancouver
Just a quick amendment; it occurred to me this evening to try boosting pressure up to the full 3,000psi capacity of the HiPAC setup and do the RVA tweaking thing. Managed a slightly lumpy 11.5% disparity between fastest and slowest velocity, but over 45 shots! So I'm really happy I tried that. Earlier longer springs had made shooting at full pressure a bit of a nightmare of inconsistency but using a heavy Powermax-supplied spring chopped down to 1" long with a bit more preload (3.75 turns out from max preload) then backing it out 1/4 turn every 6 shots delivered a fairly reasonable string. 45 shots per pumping session is something I can live with.


Top
 Profile  
 
PostPosted: Wed Jan 21, 2015 11:24 am 
Offline
User avatar

Joined: Thu Feb 02, 2006 11:35 pm
Posts: 3099
Location: Alberta Canada
Nothing wrong with that Gerald. Congrats upon your build. I do like your access and ability to adjust the RVA

_________________
May the cry of the pack be with you upon your hunt

Whitewolf


Top
 Profile  
 
PostPosted: Wed Jan 21, 2015 8:26 pm 
Offline

Joined: Tue Oct 13, 2009 1:27 am
Posts: 2523
Location: Vancouver
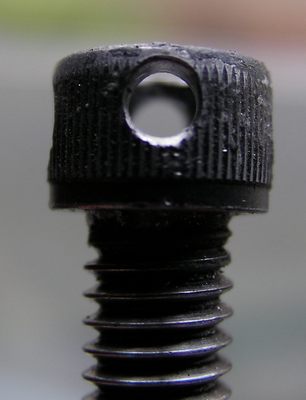
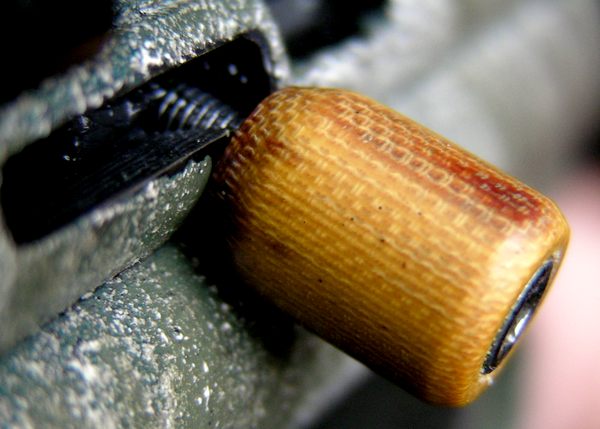
Thanks Kim. I was fairly happy with it, except for that darn leak. Thought I could hold out until after the FT meeting on Sunday, but this morning the darn thing was at zero pressure when I went to top up. Leak obviously getting worse. So I got a few proper jobs done, fixing some fiddles, then took the 2240 apart again. What I found was a destroyed delrin seal:

Image

Looked to be about 0.02mm of delrin left, and that was fairly bubbly and translucent. Not exactly what I was expecting. I thought maybe the delrin was just too slippery and air was slipping past it... but no, apparently 3,000psi boiled the plastic, or at least pushed it into a liquid-like state such that most of the seal flowed out into the recess in the brass of the valve. Some of it went right down into the valve as well, closing the port partially. I couldn't chip it out with a knife, had to chuck it in the lathe and cut it away from the brass as it was thoroughly bonded. Yup, definitely melted in under pressure.

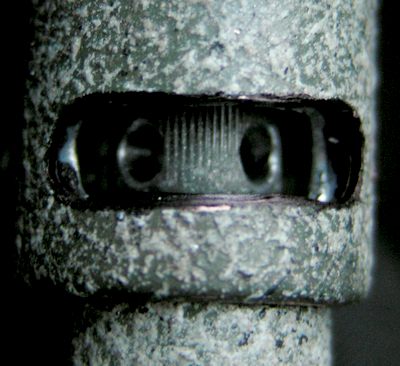
So I went to my toughest plastic rod, Ertalyte. This stuff is very stiff, has a much higher melting point than delrin, and is designed to be extremely resistant to deformation under considerable pressure. I hadn't used it previously because I didn't think it'd deform enough to form a good seal, but the delrin experiment proved I was under-estimating just how much damage all that pressure can do. So I turned the seal port a bit deeper, maybe 1mm, and opened it out slightly to be rid of the dovetail, actually making a slight step about mid-way, then cutting off the face of the lips to maybe a couple of millimetres lower. Barely kissed the bleed hole on the one edge of the Crosman valve seal seat. Then I made an Ertalyte seal to fit the new opening. Hole matching the port in the brass. Press-fit into the valve. Face contoured to be a snug fit on the nose of the HiPAC.

Image

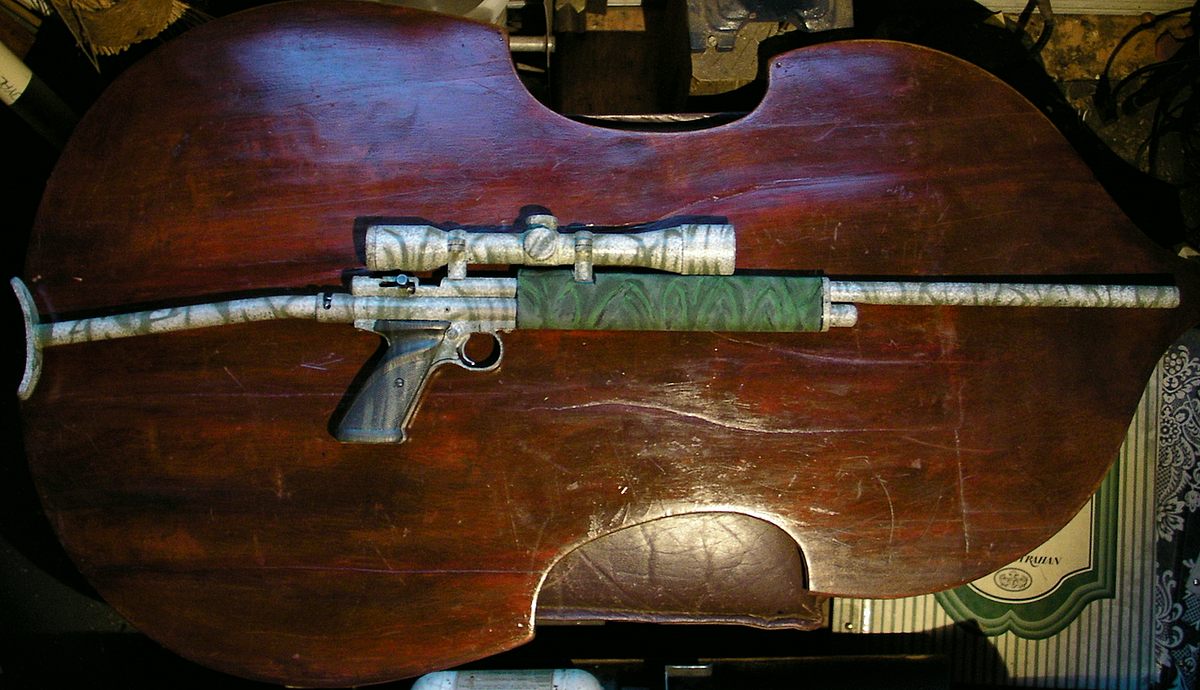
I assembled the gun and threaded in the HiPAC and pumped it up to 1,000psi. Listened, and no leaks, so I pumped to 3,000psi. Still nothing. Absolute quiet. So it was Chrony time! Oh yes, I was mistaken earlier in saying I'd used a 25mm spring; it was a 30mm long chopped spring I used, the '3K' one from Powermax.

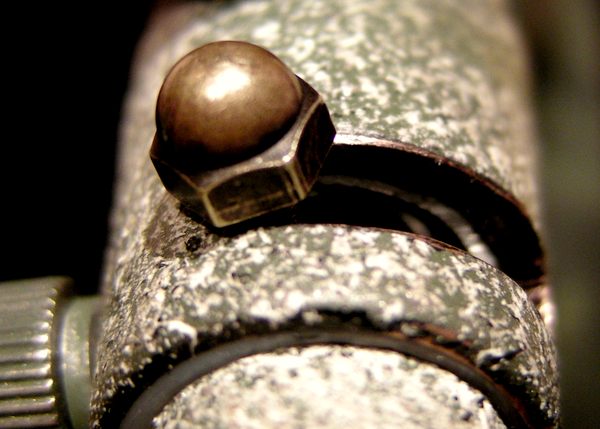
What I found was that turning down RVA preload more frequently eliminated at least some of the spikes and valleys in velocity. So I'll probably make a smaller pin tool, something I can just leave in place while looking through the scope (the current tool is too tall when in the upright position in the RVA bolt) and adjust every couple or few shots, backing off maybe 1/8th turn or less each time. I added a nut to the RVA bolt, loc-tited it into place then turned it down in thickness until it was giving my average velocity from the first shot at 3,000psi when fully dialed in. So my starting point is my average velocity at full pressure, then I just back it off every few shots, finally getting to about 1.8 turns out from maximum for the last series of about 10 shots.

My new total with the HiPAC leak fixed is 55 shots, finishing at 800psi left in the tank. WOW! I had sort of given up on that high a shot count. When ordering the HiPAC and 1 extension I'd hoped for maybe 40 shots, or a few more, but since running from 3,000psi made for such a huge gap in velocities through the fill it made no sense to pump that high; I was settling on pumping to just 2,200psi and getting 20 or 25 shots. More than double that now, and only the added fuss of keeping track of how far to back out the RVA, that's just excellent. Took a lot of custom stuff to get here. A home made delrin poppet seal, lots of tweaking in the valve volume and port, custom transfer port, hammer mass dramatically reduced, spring length and RVA endlessly tinkered with. Far too much work to stop the HiPAC from leaking. But it's done.

Now I just have to learn the new routine, find a method of remembering where I'm at with shot counts and RVA adjustments such that the process comes close to automated. I'm thinking of making a pellet holder out of hard foam with 55 holes in it, pellets arranged in rows with gaps to remind me when it's time to drop spring tension as I load. Mount that on the side of my neoprene sleeve maybe.


Top
 Profile  
 
PostPosted: Wed Jan 21, 2015 10:56 pm 
Offline
User avatar

Joined: Sun Feb 10, 2013 1:16 pm
Posts: 1787
Wow, that delrin seal really is toast isn't it. I wouldn't have guessed that. Well done on sorting it out. I've been chasing leaks too this week, and just got it fixed this evening (I think, we'll see in the morning), so I know how frustrating that can be.

Do you pump straight into the hipac? I was wondering how hot it gets during filling, but I can't imagine it gets hot enough to do that to the delrin. I guess it must have been the pressure or the effect of tightening the hipac against it. That might have generated both heat and pressure at the same time.

The shot count is great, but I'm not sure I'd want the hassle of having to adjust the rva all the time, although your setup makes it about as easy as possible.

Jim


Top
 Profile  
 
PostPosted: Wed Jan 21, 2015 11:20 pm 
Offline

Joined: Tue Oct 13, 2009 1:27 am
Posts: 2523
Location: Vancouver
Yeah, some combination of all that pressure in the tube while tightening to stop the leak is probably what did the number on the delrin. Filling it from a Gehmann pump takes about a minute, and it gets warm, but like a cup of coffee that's been sitting around for 5 or 6 minutes warm. Nothing dangerous to plastics. The hose and QD fitting I got for this sort of connector (my Brocock Atomic has the same nipple) from Best Fittings connects to the HiPAC directly, yes. It's all turned out of one piece of steel at the front end, then a threaded tube extension, then another piece of steel for the back tube and reduced tube and connector for the valve seal. Three pieces of steel with a simple poppet valve up front (and my urethane seal), a couple of plastic washers and a big spring filling the front tube to keep that valve closed.

It is a bit of fuss adjusting the RVA. The remaining part which bugged me was having to pick up a special tool, use it, then put it down every few shots. So I just made a little steel pin tool with a small brass acorn nut soldered to the end, just the right length so the nut barely clears the outer tube. Then I drilled a small hole into the end of the socket in the RVA bolt, just the right size for the smallest neodymium magnet I have, and glued that into place. Since the cross-holes are barely above the socket bottom the magnet holds quite well on the pin tool. Can't fall out, even if I shake the rifle, but it's easy to lift out when I need to change holes. So one less fussy thing to bother me.

Though I was wondering once I'd figured out the smaller decrements every few shots thing... wouldn't it be great if there were some simple clockwork thing I could do to make it trip a catch every shot instead, letting a cog slip, pushed by a clock spring, unwinding the RVA just one gear notch. Time it right and the velocity could be evened out quite nicely, given the right balance of spring length and strength, spring preload, valve spring length and preload, initial velocity matched to air pressure... Bit of a rabbit hole, isn't it? One could dedicate one's life to sorting out such variables and tinkering these cheap pistols to perfection.

Image


Top
 Profile  
 
PostPosted: Wed Jan 21, 2015 11:30 pm 
Offline
User avatar

Joined: Fri Sep 23, 2005 2:29 pm
Posts: 6297
Location: Okanagan,BC
GerardSamija wrote:

Bit of a rabbit hole, isn't it? One could dedicate one's life to sorting out such variables and tinkering these cheap pistols to perfection.


I do all of my tinkering in my mind.

I have no practical skills when it comes to any of this stuff; which is why I am in awe of all of you who do all of this mad mod work.

I really enjoy all of this posting - although half the time I don't even understand it; just appreciate the results.

:shock:


Top
 Profile  
 
PostPosted: Thu Jan 22, 2015 1:39 am 
Offline

Joined: Tue Oct 13, 2009 1:27 am
Posts: 2523
Location: Vancouver
Well I'm learning a bit at a time. Did my first airgun overhaul at age 12, including cleaning and lubing the mainspring and cylinder, making new leather seals for the piston and breech, and repairing a broken linkage in the trigger somewhere with a bit of coathanger. Got another couple of years' worth of regular shooting out of that little Czech break-barrel. I started much earlier in the general tinkering department. Pulled things apart when they got broken, then eventually started improving things which weren't broken but just didn't work well enough. Made and fixed things more and more. Then at about age 26 I realised I wanted to be a luthier, so I started studying. Been doing that ever since, mostly repairing instruments, but occasionally making one. My work website is always out of date, but have a look if you like:
http://www.luthier.ca
Airguns came back to my attention about 5 years ago, and my natural tendency to tinker found yet another focus. I've worked on every airgun I have, improving them in lots of ways or in a couple of cases just restoring them when no improvement was necessary. The 1950's Webley pistols don't really need improving. Darn near perfect in design and workmanship. The Pardini pistols (rrdstarr has my previous K10, i still use the K12) are very close to perfect but there was room for slight improvements, and of course grip carving.

Anyway, by that ramble I guess I'm suggesting not to be afraid to get out some tools and tinker a bit, at least to do maintenance. There are so many forums and other searchable resources these days it's a tinkerer's hayday, easy to find help with almost anything if you get stuck. Sure easier than it was for me growing up. Libraries are great... but rather slow to use and limited in lots of ways where the web isn't.


Top
 Profile  
 
PostPosted: Thu Jan 22, 2015 7:10 am 
Offline
User avatar

Joined: Sun Feb 10, 2013 1:16 pm
Posts: 1787
The clockwork rva adjuster sounds brilliant. Possibly wouldn't even need a spring if the travel per shot is small, you could drive it directly from the movement of the bolt. Back of the bolt engages a ratchet which runs a gear chain to the rva. Need to figure out if that makes it difficult to reset the rva when recharging. I'd still love to do an electronic hammer, but then I'm a software guy. If only pressure sensors were small and cheap.

Jim


Top
 Profile  
 
PostPosted: Thu Jan 22, 2015 5:53 pm 
Offline

Joined: Tue Oct 13, 2009 1:27 am
Posts: 2523
Location: Vancouver
Did two more Chrony runs today to pin down the RVA preload schedule. Seems I'm pretty close to nailing it with this, from a 3,000psi fill. I've added spots ahead of the RVA adjuster groove for each 16th of a rotation.

- shoot 5 shots with RVA maxed out
- turn RVA out 1/16th turn before 6th shot, then every second shot until shot 10
- turn RVA out 1/16th turn every shot until shot #40
- leave RVA alone at this setting until finished

Keeps my line a lot less squiggly than other schedules. Still a bit spiky with about a 7% spread from high to low, but that's acceptable for an unregulated 2240 I should think. I'll see if it's good enough this Sunday at Mission.

And with all this testing I found the shortened, larger-threaded version of the Crosman steel bolt knob with the hex head to be getting painful. So I made a new knob for the bolt using a high quality 10-32 Allen bolt mounted in a piece of polished canvas micarta. It's something I had around for knife scales. Very tough laminate. With a 14mm diameter it feels soft against my bruised trigger finger. Fitted it to ride just grazing the steel breech, so the load of pulling is partially borne by the micarta against the breech on either side of the slot. The bolt head and shaft are a very firm fit into the micarta. Less likely to bend the bolt over time.

Image

And here's a 6 shot group from 7 metres, leaning on a doorframe. 7mm centre to centre at widest. The black dot above was my felt pen aim point, 11mm above the dot I was trying to hit, as my zero is at 10 metres. Tested at 10 metres earlier from a less stable position and it wasn't quite that good. Not brilliant, but I'm feeling okay about accuracy with this thing from a casual rest. Might make a beanbag sort of thing before Sunday, or not. Don't really know what the custom is with such things at FT gatherings. Definitely going to make a pellet series tray so I don't have to count too much. 4 bowls, for 5, 5, 30, then 5 more to finish as I'd rather fill at 45 than risk running low and hitting below the mark.

Image

Oh, and the seal held. Checking this morning the pressure was at 2,800psi after sitting for 12 hours. Some subtle leaking going on somewhere, but close enough, and I'm hearing no little whining, hissing sounds.


Top
 Profile  
 
PostPosted: Thu Jan 22, 2015 6:36 pm 
Offline
User avatar

Joined: Sun Feb 10, 2013 1:16 pm
Posts: 1787
One of the things I like about running low power 177 is I can use very light hammer springs and have a nice easy bolt action. But that handle looks the business! I'd not heard of micarta before.


Top
 Profile  
 
PostPosted: Thu Jan 22, 2015 7:41 pm 
Offline

Joined: Tue Oct 13, 2009 1:27 am
Posts: 2523
Location: Vancouver
I was given this chunk as a sample by a plastics shop about 20 years ago. Used it for several knife handles. Very durable stuff, and it ages to a dark amber colour in use which is nice. I've since researched micarta in various knife making forums and found all sorts of variations. People make their own, and there are suppliers like this one:
http://www.knifekits.com/vcom/index.php?cPath=40_309
It's smelly to machine and sand so dust collection is a good idea. Finishes with just fine steel wool rubbing, or you can oil or wax it if you like. Epoxy sticks to it well. I guess you'd just soak your favourite natural fibre cloth in epoxy until wetted through then layer it up, then press it between wax paper and a couple of boards with lots of clamps. I think. Never yet tried it, but I should. Bet some really neat material could result from experimentation with various fabrics.

The hammer spring strength needed to smack open the valve at 3,000psi is fairly substantial, so Powermax supplies a heavy spring for that purpose. I've trimmed mine, but as I lowered the mass of the hammer quite a bit I still need a fair bit of preload to get the valve open. Lightening the valve spring helped too.


Top
 Profile  
 
Display posts from previous:  Sort by  
Post new topic Reply to topic  [ 44 posts ]  Go to page Previous  1, 2, 3

All times are UTC - 5 hours


Who is online

Users browsing this forum: No registered users and 4 guests


You cannot post new topics in this forum
You cannot reply to topics in this forum
You cannot edit your posts in this forum
You cannot delete your posts in this forum
You cannot post attachments in this forum

Search for:
Jump to:  
News News Site map Site map SitemapIndex SitemapIndex RSS Feed RSS Feed Channel list Channel list

Powered by phpBB © 2000, 2002, 2005, 2007 phpBB Group

phpBB SEO