Canadian Airgun Forum

The #1 Community for Airguns in Canada!
It is currently Thu Apr 18, 2024 6:49 am

All times are UTC - 5 hours


The Canadian Airgun Forums are a place for people to discuss and learn about airguns and the airgunning sport in Canada. There are lots of discussions about airguns, airgun accessories, reviews, modification and repair information, airgun events, field target and free classifieds!


You need to register before you can post: click the register link to proceed. Before you register, please read the forum rules. By joining our free community you will have access to post topics, communicate privately with other members (PM), respond to polls, upload your own pictures, and access many other special features. Registration is fast, simple, and absolutely free! To start viewing messages, select the forum that you want to visit from the selection below.


Post new topic Reply to topic  [ 9 posts ] 
Author Message
PostPosted: Wed Oct 04, 2017 4:12 pm 
Offline
Site Moderator

Joined: Sat Sep 03, 2005 9:25 am
Posts: 4595
Location: Ontario, Canada
My Canadian detuned Optimus was shooting reasonably well but never had the accuracy of my full power version. The full-power I detuned to 800fps and this detuned Canadian version I uptuned to 630fps. My review in the other sub-forum section explains the details on the two rifles.

After pushing a bunch of pellets through the detuned Optimus, I discovered that the bore was far from acceptable. It started off tight at the breach and then got tighter right after the block. About 3" from the muzzle it got loose. I tried polishing with JSB Paste mixed with jeweler's rouge but that wasn't enough. A fresh crown didn't seem to help either.

It took some lengthy thought but I decided to sand the bore as per directions from chevota. Sanding by hand seemed like a radical approach to fixing a bad barrel. I ended up splicing a couple of bamboo skewers together to give a 2 foot rod with 1/8" thickness. This worked out well when I taped and wrapped a 4" wide strip of 320 grit. The constricted areas in the barrel were easy to find while sanding. I focused on them until they relaxed. Then I moved to 600 grit and finally some JSB Paste on a patched q-tip that I threaded into a .177cal cleaning rod. I touched up the crown with a brass screw and a JB/rouge blend. The breach seal was changed to a fitted 109 Viton o-ring that I thinned a bit from the back side (sanded).

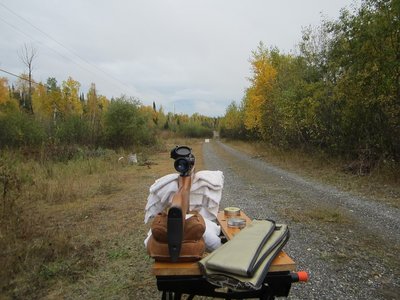
All accuracy testing was done with a Leapers 3-9AO adjusted to 9X. I shot all groups from the same shooting area and from the same rest combo. I did not remove the barrel or touch the block washers, breach plunger, or trigger. All I did was sand the bore and lightly touch up the crown that already looked great from a previous crown polishing.

--- 50 yards – 5 shot groups ---August 2017
H&N Sport - 2.78, 2.15, 2.54, 1.61, 1.90, 2.38 -- Ave = 2.23" ctc
JSB Exact - 2.49, 2.12, 2.98, 2.45, 2.96, 2.22 -- Ave = 2.54" ctc

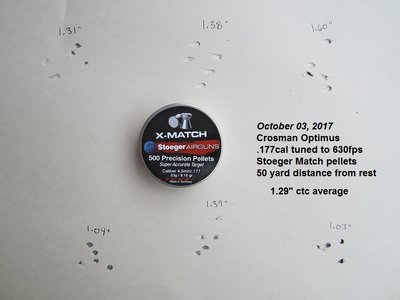
The following groups were from yesterday. Post barrel sanding. All groups were recorded and not cherry picked from a big batch.

--- 50 yards – 5 shot groups --- October 3, 2017
Stoeger Match – 1.31, 1.38, 1.60, 1.04, 1.39, 1.03 –- Ave = 1.29” ctc
JSB Exact – 1.91, 2.20, 1.93, 2.02, 1.66, 1.13” -- Ave = 1.81" ctc

My .177cal 800fps Optimus was always more accurate than the milder version. Here is what the 800fps version did this summer at 50 yards. Both rifles now seem to shoot about the same accuracy at 50 yards. I hope they stay shooting this well!

--- 50 yards - 5 shot groups --- July 2017
JSB Exact - 1.47, 1.50, 1.56, 1.18, 1.15, 1.56, 0.73, 1.09, 1.11, 1.50, 1.49, 1.25, 1.05, 1.46, 1.39, 1.56, 1.07, 1.34, 1.17, 1.69 – Ave = 1.32" ctc


Attachments:
Opt600at50 004b.jpg
Opt600at50 004b.jpg [ 160.45 KiB | Viewed 2127 times ]
Opt600at50 001b.jpg
Opt600at50 001b.jpg [ 307.29 KiB | Viewed 2127 times ]
Top
 Profile  
 
PostPosted: Wed Oct 04, 2017 4:16 pm 
Offline
Site Moderator

Joined: Sat Sep 03, 2005 9:25 am
Posts: 4595
Location: Ontario, Canada
Here is a pic of the 109 Viton o-ring stretched into the Optimus groove. It works well.

The other pic is the finished crown on this rifle. I used the common method with a domed brass screw, polishing compound (JSB Paste + rouge) and a drill.


Attachments:
Optmuzzlebreach 014.JPG
Optmuzzlebreach 014.JPG [ 110.06 KiB | Viewed 2125 times ]
Optmuzzlebreach 001.JPG
Optmuzzlebreach 001.JPG [ 117.39 KiB | Viewed 2125 times ]
Top
 Profile  
 
PostPosted: Wed Oct 04, 2017 4:29 pm 
Offline
User avatar

Joined: Thu Oct 04, 2012 10:27 am
Posts: 1427
Location: Thunder Bay,On.
So its YOU buying up the stoeger 8.18s from GMK.....lol...I'm going to buy the rest before you return....nice groups....I read that 2 inches CTC at 50 yards is considered pretty darn accurate for break barrels so you definitely have THAT covered....Im still pulling 2-2 1\2 inch groups at that distance ( same ammo ) with a couple of my guns....I..might have to look into barrel sanding...... :D

_________________
The cave you fear to enter....holds the treasure you seek


Top
 Profile  
 
PostPosted: Wed Oct 04, 2017 4:30 pm 
Offline
Site Moderator

Joined: Sat Sep 03, 2005 9:25 am
Posts: 4595
Location: Ontario, Canada
Here is a pic of the spliced skewers. I split one end and made the other into a wedge. The pieces were carefully fastened with epoxy and sanded to size. The process is like footing a cedar arrow. The bamboo should be much stronger than the crooked 1/8" wood dowels from hardware stores.

The sandpaper was fastened to the skewer with Scotch tape. You can adjust the thickness with how many times you wrap the paper around the skewer. You can also add shims of regular paper under the sandpaper to create more pressure when sanding. Chevota explains all this in his excellent guide. I don't want to seem like I'm pirating his material that took a lot of time and experimenting to put together. I just found that it worked well for me.


Attachments:
sandingrod 003.JPG
sandingrod 003.JPG [ 268.35 KiB | Viewed 2119 times ]
Top
 Profile  
 
PostPosted: Fri Oct 06, 2017 3:51 am 
Offline

Joined: Sat Jan 25, 2014 9:16 pm
Posts: 1287
Location: United States
I'm glad you posted that b/c a lot of people think I'm crazy for suggesting it. That and the warnings I put in there about ruining the barrel if you're not careful has scared people off as well. So maybe your success will get more people to try it.


Top
 Profile  
 
PostPosted: Sat Oct 07, 2017 9:39 am 
Offline
User avatar

Joined: Wed Dec 21, 2005 11:27 pm
Posts: 2220
Location: Toronto
That's a very clean barrel crowning job. 8)

_________________
"...await the right moment for one, and only one well-aimed shot" - Vassili Zaitsev


Top
 Profile  
 
PostPosted: Wed Jun 29, 2022 11:37 pm 
Offline

Joined: Wed Jan 05, 2011 12:35 pm
Posts: 11351
Location: P.G. B.C.
Yes, nice job on the crown. Rather than using paper, I would certainly try JB or Flitz first. Even AutoSol would work.
The "trick" is to use a one piece rod by Kleenbore. It will come with a .177 jag. i used that same jag in my .172" HMR, .17 Rem and .17AH
with .17 cal. patches.

_________________
Best Wishes
Daryl


Top
 Profile  
 
PostPosted: Thu Jun 30, 2022 12:32 am 
Offline
Site Moderator

Joined: Sat Sep 03, 2005 9:25 am
Posts: 4595
Location: Ontario, Canada
Daryl wrote:
Yes, nice job on the crown. Rather than using paper, I would certainly try JB or Flitz first. Even AutoSol would work.
The "trick" is to use a one piece rod by Kleenbore. It will come with a .177 jag. i used that same jag in my .172" HMR, .17 Rem and .17AH
with .17 cal. patches.


I do the crowns with JB Paste mixed with jeweler's rouge applied with a domed brass screw. The bore sanding actually works best when the sandpaper is wrapped around a smooth surface like a bamboo skewer or even a Kleenbore rod without the jag. This gives more contact area for the abrasive paper. The idea is to gently sand down the tops of the high or rough lands to get rid of bad roughness or tight spots. I used an old (slightly undersized) brass rod for a couple of .22 barrels. A jag works well to hold onto a cleaning patch with all the jag's edges. I used a Dewey jag for my .222Rem, .222 Improved, .223Rem, .22-250 and .22 PPC.

The barrel sanding technique is definitely a last resort. I would recommend using less aggressive methods before this step. With that said, I have had excellent results using gentle bore sanding in three Chinese springers, a Crosman pumper, a cheap Russian IJ-38 springer and a couple of Crosman pistol barrels. All these barrels were either rough inside and/or had tight-loose spots that wrecked accuracy. I always finish a sanding session by pushing JB loaded patches to clean out the grooves. The example posted above shows a cheap Crosman Optimus starting at 2.54" at 50 yards and after sanding it averaged 1.32" at 50 with the same JSB Exact pellets.


Top
 Profile  
 
PostPosted: Thu Jun 30, 2022 5:56 am 
Offline

Joined: Wed Sep 07, 2016 11:04 am
Posts: 1879
This was a very helpful post for me a few years back with a Umarex Surge (d34 clone) that couldn't group 1" ctc at 10m. Vast improvements after some tight spots mid barrel were reduced. For the crown I use valve lapping compound as the cutting agent. Worked very well.

_________________
I have some airguns.


Top
 Profile  
 
Display posts from previous:  Sort by  
Post new topic Reply to topic  [ 9 posts ] 

All times are UTC - 5 hours


Who is online

Users browsing this forum: No registered users and 7 guests


You cannot post new topics in this forum
You cannot reply to topics in this forum
You cannot edit your posts in this forum
You cannot delete your posts in this forum
You cannot post attachments in this forum

Search for:
Jump to:  
News News Site map Site map SitemapIndex SitemapIndex RSS Feed RSS Feed Channel list Channel list

Powered by phpBB © 2000, 2002, 2005, 2007 phpBB Group

phpBB SEO