Now that my shop is closed for the winter, I am trying to catch up on writing post about projects I did during the Summer.
Every year it seems that, because several of my airguns are getting older, they are a constant source of new projects. Working on them (either by fixing leaking problems or by making parts to replace/repair) keeps my hands and my mind busy.
So, when I got my WE M-14 Gas Blow-Back Replica Rifle out for a shooting session I discovered that my green gas mag was leaking. It took me a bit of time to find the information on the internet about how to disassemble the magazine. Once the outer shell was removed (by sliding out the base plate and taking out one small screw) I discovered, after the removal of the long screws holding the sealing cover, that the o-rings under the screwhead were damaged. Luckily, changing those o-rings was an easy fix because a leak from the gasket between the cover and the body would have been a different story.
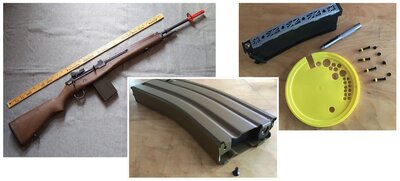
The pictures below shows my M-14 replica (left), the magazine with the small screw to remove to separate the outer shell (center) and the o-ring replacement seals made from a plastic coffee can lid (right).
Attachment:
 A01.JPG [ 209.09 KiB | Viewed 167 times ]
When looking for the information about the mag I came across a more serious problem caused by a design flaw. It seemed that after some time, the trigger group housing would start to separate and possibly to malfunction to the point that the trigger would be inoperable. The proposed option across the different sites I visited was to buy a RA-Tech steel trigger group unit. If the item can be obtained from the U.S. the price was around $200 U.S. and the only place in Canada where I found it had a price tag of $393.99 (ouch!!!).
This was not the kind of money I was ready to spend so after a bit more research I came across a guy who did a successful repair of his trigger unit (
https://imgur.com/a/bvpu2). Basically he transformed the original WE two part design into a single part (a bit like the RA-Tech trigger group). He did it by gluing parts and gluing a thin reinforcement plate over the same area.
I don’t like modifying parts in ways that they cannot be returned to their original state and this is the reason that, whenever I can, I will make a new part instead. In this case, the part is too complex for my machining skills and I had to look for another option.
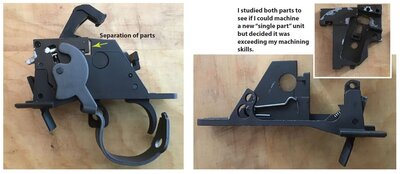
In the pictures below, we can see, on the left, the separation problem and, on the right, the two parts that would need to be grouped into a single unit.
Attachment:
 A02.JPG [ 156.63 KiB | Viewed 167 times ]
I calculated that I might have about a .015” clearance to add a reinforcement spring plate but the steel strapping that I had in the shop was .020”. With the belt sander I prepared a length of the right thickness from which I could cut my pieces. My basic idea was to bend both ends of the thin plate to have a mechanical locking system and I was hoping that double face tape would help the plate to stay in contact with the flat face of the trigger housing. I quickly discovered that the tape in my possession was not up to the job.
Also the first attempt I made was with an horizontal plate to try to pull on the vertical left edge because I thought that it would be the best way to close the separation gap. The problem was that the opposite anchor was not a vertical edge but a slanted one. Since the double face tape was not working the plate just slid up and the separation gap reappeared.
My second attempt was more successful than the first because this time, the plate was vertical and both the anchors were on straight edges. Worrying that the overlap on the small part of the trigger housing was minimal I decided to add a second plate beside it. This time, even if the top and bottom edges were not parallel it worked because the plate could not slide off. Furthermore, a hole through the thin plate would serve as another anchor once the trigger guard with its pin would be reinstalled.
Since the double face tape couldn’t be used, it is important to note that the bent anchoring surfaces of the thin plates should be done in such a way that they would want to dig in the top and bottom surfaces of the trigger housing so they will stay in place. Another difficulty was to close the gap of the trigger housing using the vise and be able to clip the spring plate in place. I should have documented it at the time because, now, I had forgotten how I did it exactly (I just remember that it was a pain in the butt).
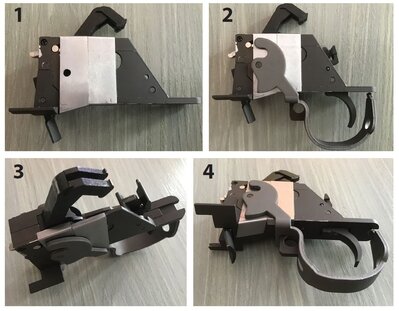
Underneath are four pictures: 1- Both plates clipped to the Trigger Housing, 2- Trigger Housing with the trigger guard installed, 3- View of the bend anchors from the top and 4- View of the bend anchors from the bottom.
Attachment:
 A03.JPG [ 140.11 KiB | Viewed 167 times ]
There might not be a lot of WE M14 owners on the forum but if there are I hope the information would be useful because the problem would be certainly encountered sooner or later.
In conclusion, my approach offers a reversible option that doesn’t alter the original parts but, on the other hand, if its not something that is important for you, a more permanent fix can be achieved with the other guy approach in the link previously given in the text.
R-Gun Pete


